How to Change the Print Temperature in Polar Cloud

Your PLA is stringing. Your PETG won't stick to the bed. A new roll says "print at 210–230°C" on the side. Whatever the reason, sooner or later you'll want to change the print temperature.
In Polar Cloud it takes about ten seconds once you know where to look.
Three profiles + one model = one sliced file
Polar Cloud uses the same setup as modern slicers like Bambu Studio and OrcaSlicer. Every print is built from three settings profiles:
- Machine profile: your printer. Bed size, nozzle size, firmware details.
- Filament profile: the material you're printing with. Type, flow, cooling, and temperatures.
- Process profile: how the part gets printed. Layer height, walls, infill, speed, supports.
Add a mesh file (STL, OBJ, or a printable 3MF), and those four things together make your sliced file.
Print temperature belongs to the filament profile. That makes sense when you think about it: PLA, PETG, and ABS all want different nozzle and bed temps, and the material is what decides them, not the printer or the layer height.
Step 1: Open your filament settings
Open a model on the build plate and go to the Settings tab in the controls panel on the right. You'll see your three profiles stacked: process, filament, then machine.
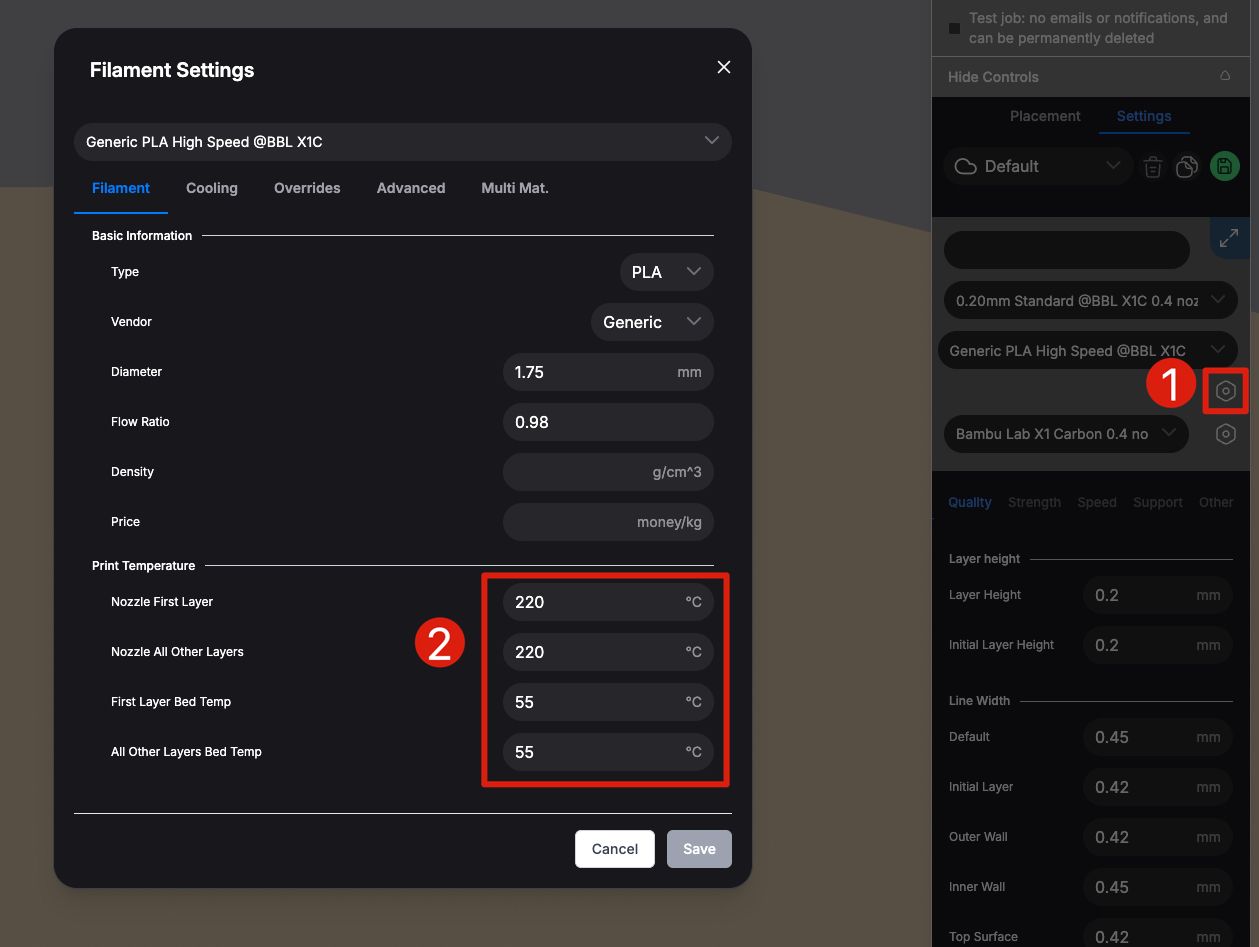
Next to the filament profile, click the small honeycomb settings icon (marked 1 below).
Step 2: Change the temperatures
The Filament Settings window opens on the Filament tab. Scroll to Print Temperature (marked 2 above). There are four fields:
- Nozzle First Layer: the hotend temperature for the first layer only.
- Nozzle All Other Layers: the hotend temperature for the rest of the print.
- First Layer Bed Temp: the bed temperature for the first layer.
- All Other Layers Bed Temp: the bed temperature after the first layer.
Enter your new values and click Save. The next time you slice, the new temperatures are used.
Heads up: Save updates the settings you have selected for this printer, so later prints use them too. If you only wanted a one-off change, set the values back when you're done.
Why are first-layer temps separate?
The first layer does the most work: it has to stick to the bed and hold everything above it. A lot of people run the first layer 5–10°C hotter on the nozzle and a little hotter on the bed to improve adhesion, then drop back down for the rest of the print to cut stringing and keep fine details sharp.
If you're not having adhesion problems, it's fine to use the same number for both.
Quick troubleshooting guide
- Stringing or blobs: try lowering the nozzle temp 5°C at a time.
- Weak layers that split apart, or under-extrusion: try raising the nozzle temp 5°C at a time.
- Prints popping off the bed or corners lifting: try raising the first-layer bed temp, and clean the bed.
- Elephant's foot (the bottom layers bulge out): try lowering the bed temp a few degrees.
Change one thing at a time and stay inside the range printed on your filament's spool or box.
Start printing
Ready to try it? Open Polar Cloud, drop a model on the build plate, and dial in your temps.
Subscribe for updates
Get Polar Cloud news and help delivered straight to your inbox.
More from the blog